Thanks to all you voters out there who cast your votes, it was great to see so much interest!
So here, after much snipping and tweeking is my firts ever video tutorial. Please let me know what you think, any tips, suggestions ect.....

Showing posts with label gift bag tutorial. Show all posts
Showing posts with label gift bag tutorial. Show all posts
Monday, 24 May 2010


Thursday, 6 May 2010
:: day of diy :: paper garland tutorial
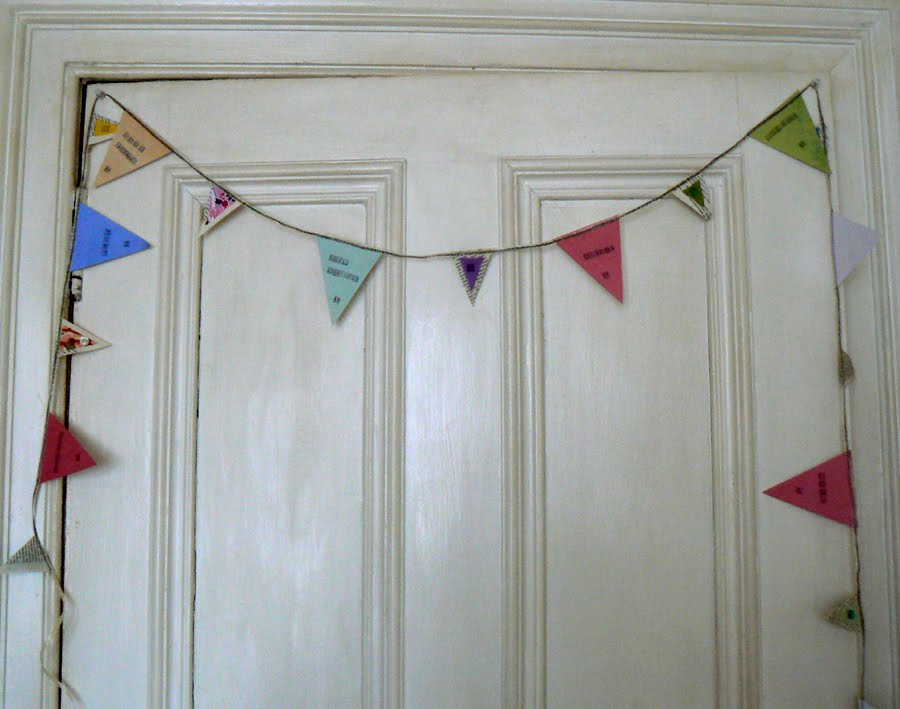 For todays ::day of diy:: I'm going to show you a little tutorial on how I made my Mum a paper garland for Mother's Day. My Mum has a cubby hole kind of room for her study that gets the sun all day. A couple of weeks ago she gutted it out, painted the walls and put in a lovely oaty coloured woven carpet. So I thought something jolly and bright for the room would be a great idea.
Materials you'll need:
::scissors
::ribbon or tafita (as long as you want your garland to be)
::different types of paper (I used 7 pieces of coloured paper A6 size for the 7 large triangles and 5 book pages for the 9 smaller triangles.) Again, you can use as many as you like depending on how long you would like your garland to be.
::buttons, sequins, little scarps of fabric. (You can use any embellishments you like, I worked with what I had handy.)
::a threaded sewing machine
::printing stamps and ink or a pen to write a message (optional)
:: PVA glue
 1. Start off by cutting out your flag shapes. I went for large and small triangles. I had some lovely soft pastel coloured paper so I decided to use them for the big ones. I decided to use recycled book pages for the small ones because it gives the garland a bit of depth and the text gives the paper some texture.
 2. Once you have all your triangles cut out, lay them out on your working surface. I then started to cut small triangle shapes from my fabric scrap bag and laying them onto the book page triangles. I decided these ones would be the ones I woule embellish, and keep the large pastel ones to stamp on.
 3. Now pva glue the fabric squares to the book page triangles, the smaller of your 2 sizes of triangle.
 4. Then start to add your little decorative bits and pieces. I put a small dollop of pva glue on this piece of fabric and added a soft pink button and a collection of purple seed beads. The glue dries and holds them in place very well.
 5. Now get out your ribbon or raffia and cut the length you are looking for. I went for 3 metres. Set your sewing machine to a zig zag stitch. This will grip the ribbon/ raffia and the paper the best.
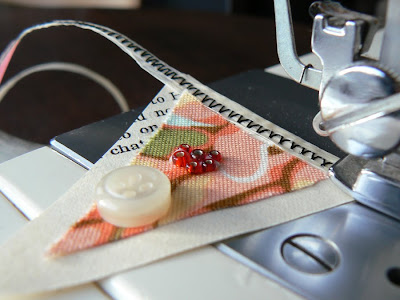 6. I started to sew just at the first triangle I wanted on my garland and then carried on right till I reached my last flag. I roughly measured the gaps in between each flag, mine were approx 10cm gaps. This is also down to you, depending on how many flags you have and how long you want your garland to be.
 7. Now to the fun bit! Lay out your stamps and get stamping. I went for little daily-do's, have faith, dance, dig in the garden, sit in the sunshine, doodle your dinner.....
You can stamp or write any thing you like. It could be a long love letter, someone's name, lyrics from a song.

 I'd love to see your versions of this so please let me know if, sorry when you get round to making yours!
xxx
Tuesday, 4 November 2008
Dec the Halls.....

Things have been going really well with my card making class, I have a group of keen and talented crafters joining me on a Thursday evening! Last we I decided to spice things up a little by making little gift boxes and they were a great hit. So this week I feel they are ready to tackle these delightful treat boxes. They will make great table decorations and we should be able to make four each in the time.
What little crafty ideas do you have for Christmas decs?
p.s. thanks so much for the insights into your treasures, it is always so interesting to hear about other peoples finds :)
Sunday, 28 September 2008
Some new creations and a little gift for you!


Here are some necklaces I have been working on last week, and I love how they have turned out! The cabochons I am working with have encouraged me to work with stronger colours in my designs. I have a whole new section in the shop for necklaces and in a couple of weeks there will be some sets there too. As a little thank you to all my friends in blog land I am offereing you, my lovely blogbuddies, exclusively a 10% DISCOUNT on everything in my shop.
So heres what to do if you see something you like:
just add the code (BLOGPAL) in notes for seller and I will refund you the 10% discount through paypal when you have completed the sale!
I'm coming to visit you all now to see what has been keeping you busy this week x
Tuesday, 9 September 2008
Crafty Monday Night
 Photo from Etsy Lab 09/09 page- designer not known
 My mini book template
Last night I stayed up late and joined in a virtual Craft Night in the Etsy labs. The project for the evening was 'mini books'. So while I sat at home in my Pj's folding paper, a group of keen crafters were sitting doing the same and discussing their dinner plans in the Etsy labs in Brooklyn!
Last night I made my fist mini book using a magazine page and stuck white stickers on it to write on. But during the night I kept waking up and doodling in my notebook all the ideas I could use my mini book for. So this afternoon while putting some new goodies in the shop I worked on Illustrator designing my first of many.

I am going to use these as little flyers to hand out to people showing them my jewellery and include them in with orders. But of course I can't stop there, tonight I am going to work on another special mini book for all my lovely blog friends! For the moment you'll just have to imagine what delights I have in store...........
Wednesday, 7 May 2008
Day 6 - the joy of friendship

 On Monday one of my bestist friends headed over to cheer me up, armed with cake, books and cheeky chat and she lifted my spirits. Then yesterday the postie delivered a surprise package all the way from the USA! One of my daily reads Katy Diddy sent me a delightful bundle of goodies. I was drawn to her blog because she seems to be using similar tools on her creative path as me and she has a passion for cupcakes too! So Thank you L for brightening my day and for the beautiful goodies :)
The weather here just now is beautiful, warm, clear skies and cut grass scents, and yesterday while I was standing doing the dishes I decided I wanted a little treasure for my window ledge that would remind me of love while I do my least favourite chore. So I toddled off and came up with this.


I finally got round to creating something with the lovely paper flowers. I opted for a mibile instead of a garland and it now moves with the breeze from a corner of our grandfather clock in the hall.
Things to do today: make anniversary card for Mum and L, make up some new jewellery and work on press release. Happy Wednesday :)
Monday, 17 March 2008
Gift Bag Tutorial

I found this cute little gift bag tutorial on martha stewart last night and gave it a go. The outcome is beautiful but the instructions didn't make sence to me, so I have written my own with some little pics for you. Give it a go and let me know how you get on.
Things you'll need:
printed template sheets x 2, get them here
scissors
2 x small rectangles of card (2cm by 4cm)
2 x 9cm (90mm) pieces of yarn or twill, or ribbon or string, for handels
cellotape
double sided tape (DST)
 1. Print off the templates.
 2. Cut around one of the templates and guides showing folds and cuts.
3. Fold where shown with ----- lines.
 4. Cut out template.
5. Cut 3 slits as shown with white lines.

6. Stick your 2 pieces of handle material to your 2 pieces of card using cellotape. I went for 2 rectangles of 2cm by 4cm.

7. Turn over your 2 pieces of card and stick 2 pieces of double sided tape to each.

8. Peel off tape and stick rectangles with handles to inside of front and back panels.

9. Put 1 piece of double sided tape on printed side of tab.
 10. Fold tab around to meet opposite side.
11. Fold in bottom panels.
 12. Stick 2 pieces of double sided tape to outside bottom panel.
 13.Peel off tape and press panel down firmly.
 14. Your finished handmade gift bag!
 Give it a go and let me know how you get on and maybe even post photos of your onw handmade gift bags on your blog.
Subscribe to:
Posts (Atom)